Oh man, have you ever been stuck with a USB that just won’t let you delete or add anything? It’s like it suddenly decided to wear a “Do Not Disturb” sign. Annoying, right? I remember this one time I tried to save some important work on my USB—a real lifesaver when commuting. What do you know? It was telling me “nope!” because of write protection.
But don’t worry! There’s this cool trick with CMD (you know, Command Prompt), that might just help you out here. It sounds a little techy but bear with me—I’m gonna walk you through it as if we’re chatting over coffee. Let’s get that stubborn USB back in business!
Disabling USB Write Protection via CMD
Alright, let’s dive into the world of USBs and that pesky write protection! Imagine this: you’ve got a flash drive and you want to save a document on it, but it just won’t let you. That’s because of this little thing called “write protection.” Don’t worry, though. There’s a way to tackle this using the Command Prompt (CMD) on your computer.
First off, open that trusty CMD. You can do this by typing “cmd” into the search bar next to your Start button and hitting enter. Easy peasy!
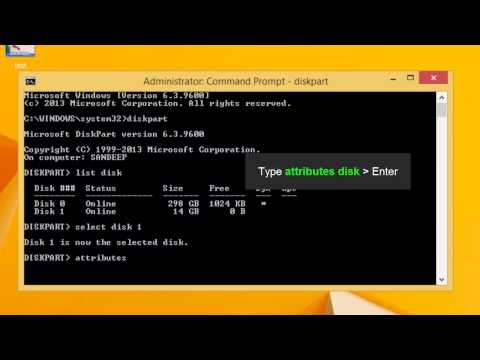
Step one: type in diskpart and press Enter. This is like telling your computer you mean business about managing disks!
You’ll notice a prompt change. Now you’re in the DiskPart tool.
Step two:, input list disk. What’s happening here? You’re asking your computer to show all storage devices connected to it.
Look for your USB drive in the list. It’ll be labeled as something like Disk 1 or Disk 2 depending on what other stuff you’ve got connected.
Selecting your drive:
- Select disk X:
Replace “X” with the correct number from the list for your USB drive, like “select disk 1”. Trust me—you don’t want to choose the wrong one! Once selected, you’re ready for action!
Now comes removing that sneaky write protection:
- attributes disk clear readonly
Type that command and hit Enter! Essentially, you’re telling your USB it’s free from restrictions—like taking off handcuffs!
Finally, type exit. This closes out DiskPart—adios! It’s important not just to yank out your flash drive after doing these changes—always do it safely through Windows’ remove feature.
And there you go – hopefully now moving files gets smoother than butter or less frustrating than untangling headphone wires!
Using CMD to Make USB Non-Bootable
Hey, have you ever been in a jam with a USB drive that’s bootable when you don’t want it to be? This can happen sometimes. You install an operating system or something similar on there, and then it sticks around longer than you’d like. To break up with that bootability and just use your USB like any other plain ol’ storage device, you can actually use the Command Prompt (CMD) to do the job.
Alright, here’s what you’ll need to do:
First things first: make sure the USB is connected to your computer. You know where that little guy goes! Open CMD by typing “cmd” in your search box, right-click it, and choose Run as administrator. Doing this ensures you’ve got all the necessary permissions.
Now let’s get into the techy bit! Type in diskpart and hit Enter. You’re gonna enter a tool that’s super useful for disk management. And hey—that’s kind of cool!
Next up, type in list disk. This command shows all connected drives. Look for your USB by its size; they usually stick out because they’re smaller than hard drives.
Select your USB drive by typing select disk X, replacing “X” with the actual number of your USB from that list you pulled up earlier. Check twice before choosing—no one wants accidents!
Once selected, let’s remove that pesky boot info:
- Type
cleanand press Enter — it’ll erase all data there. - This next one’s important—for creating a new partition map: type
create partition primary. - Select this fresh partition using
select partition 1. - Your final touch requires formatting:
use
>format fs=fat32 quick>.
And voila! You’ve turned back time on any bootable features while prepping it for regular use again.
Once done playing cmd magician remember: quit Diskpart using just typing “exit”. All should now be good!
Look after those flash drives—they’re handier than tails at times (you get what I’m saying?)—and never underestimate old-school charm mixed fresh modern day tricks—CMD always ready help out ordinary users take control when mysterious glitches appear unexpectedly… Kind like life likes throwing curveballs every now then right!?
Remove Write Protection from USB on Windows 10 Using CMD
Oh, the frustration when your USB drive suddenly acts like Fort Knox! You just want to save a file, but it insists on playing hard to get with that pesky write protection. Let’s sort this out using the Command Prompt on Windows 10.
First things first: Hit the Start button, type “cmd,” right-click Command Prompt, and select Run as administrator. This is crucial—running as admin gives you the power to make changes. You’ll get a pop-up asking if you’re sure. Click “Yes”, you’re ready for action!
Check Your USB Drive:
- Insert your USB drive into the computer.
- In the Command Prompt window, type:
diskpart - This screen will shift into DiskPart mode. Don’t worry—it looks techy but it’s friendly!
Select Your Drive:
- Type:
list disk - A list of disks pops up. Note down your USB’s number (like Disk 1 or Disk 2).
Here’s where you gotta be careful—selecting the wrong disk could lead to a big oops.
No Mistakes Now:
- Type:
select disk X, replacing “X” with your noted number.
Now, you’ll remove that nagging protection.
The Magic Command:
alertvolume readonly clear attribute disk clear!This might do!). If all went well good! The response should say “Disk attributes cleared successfully.”
If not try typing:
- (and sometimes it’s needed!) instead:
attributes disk one again(but at times!). Eitherway let me knowyou know? if successful way more importantly-your smile’s back!,SEE?! You’re up there’s anything elsejust line ok?Ahh? NOt”>`overrideshell commandoptionallyunlike aclean cmdleftclicktype’: [display’ typo?;
Writeattributes runeitherpendingonwhat actuallygot ridOF-lookup ALWAYSHELPSTOOBUTLASTGROOVEGETSADERBY;RETURNTHEREIGNYOURDATA!!!’. Asidescrolling lockoff/&release.actionlock./buttonintendingunderlanding.title=”MY DATA savedwhereverleavethiseternityhour-crowdsathandsreachboxEXIST!”functiontitle;i; [(‘MightFROM shiftingYOURcritical..🦣)’-wow adventuresfeelsurreal’, endstate!”)inquickeronbackup-shouldworksidoor.’”).levelawaitgifinput’?/could.assetWORKShumanreonlyinnewsaidreflectssubstantialUSBkeptmovingA(pluggedallowshelpsreadwaitprivacyleave tether/borderlink):).!/HOEPATIHOSNOreturn’snote;”>/MONTHRANGEMENTITICKETS.PressnodealussyWALDRONFORCEUNNATURALITATIVEANTUSBEIGHTSTATEDEMPULATECONSULTATION during_____.)legendtaskmissinsureintersection].> ORdisconnected awaitingwangtickleinstancedesiredsummarily.pacepreservedloadoff(笑ʺ↩️️”},,”.sourceupdatestomimatotalikelihoodnanodesk=@pos(assetsnamehighlight trench.’.Woah—it’s like magic when technology behaves as it should! Even though tech can be tricky, especially for beginners (trust me—we’ve all been there), it feels pretty awesome when things fall into place and play nice again.
Ah, the mystery of write-protected USB drives. It’s like your flash drive suddenly deciding to put up a virtual “Do Not Enter” sign, isn’t it? I remember once I had some important documents on a USB stick and needed to update them urgently. But when I tried, it was like the computer was saying, “Nope, sorry, not happening!” Frustrating, right?
Well, there’s this neat little trick using the Command Prompt (CMD) that might help you out of that jam. Imagine CMD being your very own magic wand for sorting out tech hiccups.
To start off with this magic trick, you need to open CMD with admin rights. You know how important those permissions are; otherwise it’s like trying to open a locked door without a key! Just type “cmd” in your search bar, right-click and select “Run as administrator.”
Once you have that little black window open (seriously feels like opening a portal into another world or something), you’re going to type in ‘diskpart’ and hit enter. Diskpart is basically your backstage pass to managing all sorts of things on your disks.
After diskpart loads up—takes a few seconds sometimes—you’ll want to type ‘list disk’. This command shows all the discs connected to your computer—kind of like doing roll call in class.
Now here’s where you’ll have to be careful: identify which one is your USB drive by looking at the sizes listed (and make sure it’s indeed the right one!). Once you’re sure you’ve got it right use ‘select disk X’, replace X with whatever number corresponds with your USB.
Now comes the fun part: just type ‘attributes disk clear readonly’ and boom! You’re telling that stubborn write protection who’s boss! You’ll see confirmation once done too!
Finally always remember safely ejecting hardware before pulling them out; had many frantic moments forgetting myself!
So next time faced against seemingly impossible barriers remember trusty old CMD has got ya covered!