You know that moment when your computer decides to act like it’s got a mind of its own? Yeah, super annoying. It’s like you’re in the middle of something important, and suddenly everything comes to a halt. Breathe, you’re not alone.
Disk issues can happen to anyone. Sometimes it feels like they pop up at the worst times. But here’s the thing: they don’t have to ruin your day. There’s a trusty tool in Windows that can come to the rescue.
Imagine this tool as your computer’s superhero, swooping in just when things look dicey. It’s called CHKDSK—well technically “Check Disk.” And guess what? It’s here to save the day! Let’s make disk repair less daunting and more doable.
Ever wanted an easy way out of tech hiccups? Trust me, CHKDSK is pretty cool once you get into it. Ready for some computer magic without breaking a sweat?
Using CHKDSK to Repair Disk Errors in Windows 10
Do you ever feel like your computer is getting slower or acting weird? You know how frustrating it can be when things aren’t running smooth. Sometimes, the culprit is something simple: disk errors. Here’s a handy tool called CHKDSK that can help fix those pesky issues. Let’s walk through how you can use it.
What is CHKDSK?
CHKDSK, short for Check Disk, is a nifty Windows utility that checks and repairs disk errors and file system problems. It’s like giving your computer’s storage a quick little tune-up.
Why Should You Use CHKDSK?
Think of your hard drive like a library that’s always getting books added and removed. Over time, things can get messy. Using CHKDSK helps reorganize the “books” and fixes any damage to make everything run better.
Running CHKDSK in Windows 10
Here’s how you do it:
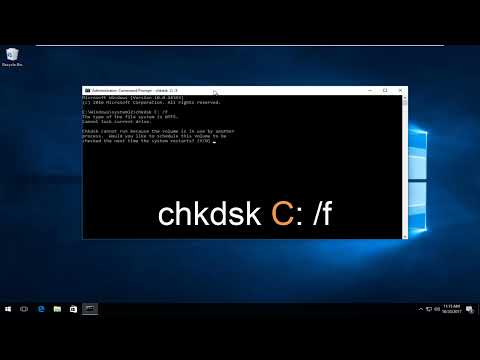
- Step 1: Open Command Prompt as an Administrator. Just type “cmd” in the search bar, right-click Command Prompt, and pick “Run as administrator.”
- Step 2: When the black window pops up, type
chkdsk C: /f. The “C:” represents your main drive letter; change it if needed. - Step 3: You’ll be asked if you want to run this check next time you restart your PC. Type ‘Y’ for yes.
Once you’ve followed these steps, just reboot your computer—easy-peasy! Who doesn’t love a good restart anyway?
The Options Explained
/f: Fixes errors on the disk./r: Locates bad sectors and recovers readable information./x: Forces dismounting of the drive before starting.
I remember when I first tried this on my old laptop—it was like breathing new life into it! But keep in mind that depending on the size of your hard disk or SSD, this process might take some time.
If you’re feeling adventurous (or desperate) with other commands or options—play safe! Keep backups of important files ’cause nobody wants to lose precious data.
Hope you’re feeling confident now with using CHKDSK to repair disks in Windows 10. If computers had feelings too—they’d probably thank us for taking such good care of them!
Command for Repairing Disks in Windows 11
Have you ever found yourself staring at a computer screen, wondering why your Windows 11 PC isn’t running as smoothly as it should? I’ve been there too. It turns out, a troublesome disk can be the sneaky culprit behind those issues. The good news is that Windows has a built-in tool that might just save the day.
Command to Repair Disks: In Windows 11, there’s this neat little command-line tool called CHKDSK. It’s like having a digital mechanic in your pocket. This tool checks and repairs hard drive errors which could be slowing down your system or causing glitches.
Here’s what you need to do:
- Open Command Prompt as Administrator: Press the Windows key, type “cmd”, right-click on “Command Prompt,” and select “Run as administrator.” Your mom would say it’s always best to double-check you’re doing things right!
- Enter CHKDSK Command: In the Command Prompt window, type
chkdsk C: /f /r. Replace ‘C:’ with whichever drive you’re looking to repair. - The Switches Explained:
/f: Fixes any errors found on the disk./r: Locates bad sectors and recovers readable information—makes sure nothing’s lost.
- Sit Back and Wait: If you’re working on your main drive (usually C:), you’ll need to restart your computer so CHKDSK can run before Windows starts up again. Have some tea while it does its thing!
Remember, sometimes things might not go exactly smoothly. If CHKDSK can’t lock the drive, it’ll ask if want it to check after a restart. Simply say yes by typing ‘Y’ and hitting enter.
It kind of reminds me of when my old car wouldn’t start reliably—I’d tweak some things under the hood (not really knowing what I was doing), but eventually something would work! Same goes here; with patience will come results.
Surely helps knowing these little commands can give just enough power over technical hiccups without calling for help immediately!
Running Check Disk Command on Windows 10
Sure thing, running the Check Disk command on Windows 10 can seem a bit daunting at first, but it’s actually pretty straightforward once you get the hang of it. It’s kind of like giving your hard drive a little health checkup to make sure everything’s ticking along nicely.
What is Check Disk?
Check Disk, or chkdsk as it’s often called, is a handy utility in Windows that helps you scan and repair errors on your hard drive. These errors can crop up from things like unexpected shutdowns or software glitches. Running this command can help keep your system stable and maybe even fix some performance issues.
When should you use it?
You might want to run Check Disk if your computer is acting slow, if files are going missing, or if you’re getting those pesky error messages popping up out of nowhere. It’s always good to rule out disk issues before moving on to other troubleshooting steps.
How do you run it?
Running Check Disk involves a few simple steps:
- First off, you need to open Command Prompt as an administrator. You can do this by searching for “cmd” in the Start menu, right-clicking on Command Prompt, and choosing Run as administrator. A black window will pop up with some text.
- In the Command Prompt window, type
chkdsk C: /f /r, then hit Enter. Here’s what you’re telling your computer:
– The “C:” tells which drive you’re checking.
– The “/f” switch fixes any errors found.
– And “/r” locates bad sectors and recovers readable information. - If you’re checking your main drive (the one with Windows installed), you’ll likely see a message saying it can’t run because the volume is in use by another process. It’ll ask if you’d like to schedule this task for next restart: type “Y”, press Enter, and then restart your computer.
During rebooting it’ll take over and do its job before booting into Windows fully.
A personal touch:
I remember once when my computer kept freezing randomly; nothing I did seemed to solve the problem until someone suggested trying Check Disk. I followed these exact steps one night while having tea—and guess what? Magic happened—my stubborn PC started working again without those annoying hiccups! Seriously saved me loads of frustration.
Remember not all miracles happen instantly depending on how much space/data-your disk-holds; sit back enjoy another cup while technology does its magic.
So there ya go – give-it-a-shot next-time-stuff-acts-up might work wonders-like-did-for-me!
Have you ever had one of those frustrating moments when your computer just starts acting weird and slow, like it’s moving through molasses? You click on something, and it takes forever to respond or, even worse, you get an error message that seems to come out of nowhere. One summer, my laptop decided to throw a fit right in the middle of a project deadline week. I remember sitting there staring at the screen, feeling utterly helpless.
That’s when someone mentioned this little-known hero in Windows—something called “CHKDSK,” which stands for “Check Disk.” It’s a command built into the operating system that can help sift through those mysterious disk issues. Running CHKDSK is like giving your hard drive a bit of a health check-up. Imagine having tool that can scan for corrupted files or bad sectors on your disk and then attempt to fix them! Sometimes just running this command makes things look brand new again.
To run it, you’d typically open up the Command Prompt with administrative privileges (think of it as having the special key to open all doors). You type in something like `chkdsk /f`, where “/f” tells it to fix any errors found. If you’re curious enough and want more details about what’s going on with your disk, you might add “/r” too—it’ll make things take longer but will thoroughly check for bad sectors too.
One thing I learned always have backup before starting any repair process because while tools like CHKDSK are great they aren’t perfect magic wands; things could go wrong occasionally. But many times it’s worked wonders!
So next time you’re frustrated by unexplained glitches or performance hiccups from your trusty computer friend remember there’s stuff like CHKDSK at hand ready play nurse.! Just don’t forget accessing admin privileges is key before beginning any repair journey…