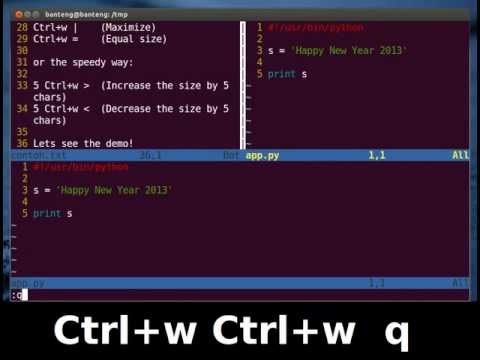
Okay, so let me tell you about Vim. It’s kind of this mystical editor that some folks love every tiny button of, and some just run away from! You’re gonna see what I mean. But here’s the kicker—splitting windows in Vim? Total game changer!
You ever try juggling a bunch of stuff at once? Kind of like having five browsers open while you’re trying to multitask—a bit chaotic, right? Well, in Vim, you can actually split your screen and look at different files side by side!
Sounds handy? Oh yeah! Imagine writing code in one window and checking documentation in another without switching back and forth constantly. Pretty neat trick for focus if you ask me.
And don’t worry if it sounds a bit scary or complicated. You know me, I’m just here to break it down like we’re chatting over coffee. We’ll get through these nifty window splits together!
Managing Vim Split Window Layouts
Oh, Vim! It’s one of those tools that can either make you feel like a total wizard or leave you scratching your head in confusion. But once you get the hang of it, it’s truly magical. If you’ve ever heard the term **split windows** and thought, “Huh?”, you’re in for a treat. Let’s chat about navigating these splits for some cool enhanced editing.
Imagine you’re editing multiple files at once or even different parts of the same file. Instead of opening several terminal tabs or windows, you can just split your current Vim window into sections—kind of like having a multitasking superpower.
Vertical and Horizontal Splits
You can split your window vertically or horizontally depending on what fancy setup you want.
- Vertical Split: Type
:vsplitwhile in command mode. Voilà! You now have two side-by-side windows. - Horizontal Split: Use
:split, and you’ll see one window on top and the other at the bottom.
Navigating Between Windows
Jumping from one window to another is as easy as pie.
- Ctrl + w + w: This little combo moves the cursor to the next window each time you press it.
- If you’re curious about moving to specific directions, try:
- Ctrl + w + h: Move to the left window.
- Ctrl + w + j: Move downwards.
- Ctrl + w + k: Move upwards.
- Ctrl + w + l: Jump right across!
Years ago, when I first tackled split windows in Vim, I remember feeling overwhelmed. It was only when trying to edit several config files at once that I saw just how neat this feature could be. Imagine not needing tabs for every file. Neat-o!
Sizing Your Windows
Adjusting their size makes all difference.
:resize N: Resizes the current window to N rows tall (for horizontal adjustments).:vertical resize N: Changes vertical size; type an N that fits your view perfectly!
Rest assured managing Vim split windows is not just functional but also fun once you get past those initial bumps. Experiment away; see what works best while keeping things smooth with shortcuts mentioned here!
Managing Split Windows in Vim on Mac
Navigating Vim can feel like deciphering a cryptic puzzle at first, you know? With its powerful editing features and text manipulation capabilities, it can be a little intimidating. One standout feature is managing split windows. Imagine it as having multiple pages or sections of a book open at the same time for quick flipping back and forth. Sounds handy, right? Especially on a Mac, where multitasking is practically second nature.
Opening Split Windows:
To open a new window horizontally, you simply type `:split`. If you’re thinking vertically, try `:vsplit`. It’s as easy as pie! The screen will divide into sections—each showing the file you’re working on or different files simultaneously. Pretty cool for those juggling between multiple scripts or documents.
Moving Between Splits:
You’ll often want to jump from one split to another. Just use `Ctrl + w` followed by one of these:
w: Move to the next window.: Navigate in that direction.h/j/k/l: For those comfy with Vim’s motion keys!
Resizing Windows:
Sometimes those splits need adjustments; maybe one’s too small to read easily. You resize using `Ctrl + w` followed by:
=: Make all equal size.+/– li > : Adjust height. li >
>/ li > : Adjust width. li >
ul >I remember when I first started using Vim—felt like learning another language! Once you get the hang of these commands though, it becomes such second nature that you’ll wonder how you’d ever managed without them!
Closing Windows: b >
Finish ed with that document ? No problem . Use ` : quit ` within the targeted split . If something ‘ s unsaved , Vim ‘ ll remind you not to leave your work behind !Whenever diving into something new , initial hurdles seem uncomfortable , right ? With practice navigating these splits becomes much smoother — enhancing productivity and efficiency tenfold .
Hope this helps you take charge over your workspace in no time !
Vim: Splitting Screen to View Two Files
Vim is like your cozy little corner in the world of text editors. Sometimes you just want to work on two files at the same time without jumping back and forth, right? Splitting the screen in Vim can save you heaps of time and hassle.
Understanding Split Windows
When you’re in Vim, splitting your window lets you view multiple files side by side. Imagine sitting at a big desk with two documents open—you get the picture! Here’s how you can do it:
- Vertical Split: Type
:vsplitfollowed by the file name. For example,:vsplit file2.txt. You’ll see two sections side by side. - Horizontal Split: Use
:split. Just like before, type:split file2.txt, and you’ll have one on top of the other.
Navigating Between Splits
Once you’ve got those windows open, moving around them is another story:
- Switch Focus: Use Ctrl + w, then tap an arrow key towards your target window. It’s like pointing a pen to where you wanna write!
- Close a Window: To close one split window, type
:q, but make sure you’re focused on the right spot first.
A Little Personal Tale!
I remember back when I started using Vim. I’d type furiously between files—flip-flopping everywhere! One day a friend showed me this splitting trick; it was as if my world expanded right there on my screen.
Some Practical Tips
- Pasting Text: Use registers if copying between files—trust me; they come handy!
- Sizing Windows: Adjust sizes easily with commands like resizing horizontally using Crtl-w+.
- Tiling Your Files Effectively:When working with many files tiling them logically makes everything smoother—it feels pretty zen once everything’s lined up nice ‘n’ neatly across yer screen.
Remember: there’s no shame taking baby steps till things stick—they eventually do! It’s much simpler than rocket science.
And now… go try this out! Have fun exploring all those nifty splits within Vim—it’ll be worth every keystroke spent tinkering around therein… trust yourself along each learning journey therein too because mastering even simple functionalities makes life lighter duty-wise over-time⎯kinda feels similar hitting sweet spots technology-wise doesn’t it?!
Oh, navigating split windows in Vim—what a ride! If you’re like me and have found yourself tangled up in the intricacies of Vim’s functionalities, you’ll know exactly what I’m getting at. There’s this moment when you first open Vim, and everything feels a bit overwhelming. All those commands… It’s like stepping into this vast ocean of possibilities without a map.
But here’s the exciting part: once you get the hang of it, especially with splitting windows, it feels like unlocking a superpower. Imagine you’re working on one file, but then you realize you need to peek into another file for some reference. Instead of opening another program or tabbing out—bam! You split your window. You can have multiple files side by side or even stack them on top of each other. It’s like having eyes all over without losing focus.
Getting there might take a bit of practice though. The commands themselves are surprisingly logical once you’ve used them enough. For example, using `:split` to open horizontal splits or `:vsplit` for vertical ones is pretty straightforward after you’ve done it a few times.
I remember early on when I tried using these splits during some late-night coding session (probably bleary-eyed and clutching coffee). At first, my brain had its fair share of tiny meltdowns from juggling multiple panes—it felt chaotic! But gradually things started clicking together; moving between panes with Ctrl + W followed by directional keys became second nature. It’s nothing short of life-changing to have different areas tackled simultaneously!
So if splitting sounds daunting at first glance—you’re not alone—but know that persistence leads toward immense productivity gains in your workflow as each command becomes muscle memory over time… Keep at it! Before long—you’ll be breezing through editing sessions like an absolute wizard navigating through magical portals right inside your terminal screen… Phew!!
- Vertical Split: Type