Hey, you know how it is when your computer decides to update right in the middle of something important? Yeah, we’ve all been there. One minute you’re working fine and the next thing you know, there’s a pesky update causing all sorts of chaos.
Here’s the deal: not every update is your best friend. Sometimes they mess things up rather than fix ’em. I once had an update that turned my audio settings into a total nightmare just hours before an online meeting. Talk about stressful!
So, if you’re dealing with a Windows 11 hiccup post-update, I’ve got your back. Uninstalling updates isn’t as scary as it sounds—and I’m here to walk you through it like I would with a friend over coffee.
Ready to roll up those sleeves and tackle this together? Let’s make your PC purr like a kitten again!
Manual Uninstallation Steps for Windows 11 Updates
Sure, let’s dive into this. So, you’ve got Windows 11 on your computer, and sometimes those updates just don’t seem to blend well with your system, right? Maybe a recent update is acting up. Here’s how you can manually uninstall those pesky updates.
Finding the Updates Panel:
First things first: you need to locate where these updates are hiding.
- Press Windows + I to open the Settings app. It’s like pulling down the blinds into the world of configurations.
- Select Update & Security. This is where you’ll find what updates have been installed.
- Head over to Windows Update, then click on View update history. Think of it as your computer’s diary for its software changes.
Picking Out the Problematic Update:
Once you’re looking at that list- find the update that’s causing trouble and note down its name or code.
- The list might look overwhelming but don’t worry. Each entry will have a “KB” number, which is unique for every update.
- If you recently installed an update and noticed issues right after, that’s probably your culprit!
The Uninstallation Process:
Now comes the part where you kick out that unwanted guest.
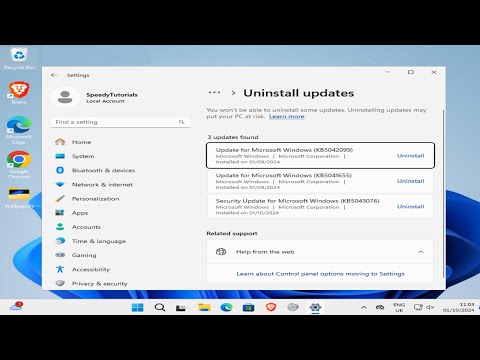
- Click on “Uninstall updates”. This will redirect you to Control Panel’s little corner made just for uninstalls.
- You’ll see another list similar to before; scan through it and find your identified bad guy (remember that “KB” number?).
- Select it and hit “Uninstall“. It’s like turning off an annoying song that’s been stuck in repeat mode.
A Friendly Note:
After all this banishing process—restart your computer so everything settles back into place. Like taking a deep breath after cleaning up a messy room.
In case things still feel wobbly afterward or some features go missing, consider reinstalling bits through Windows Update again (they might’ve fixed whatever bug was bugging them).
And there ya go! It’s always great knowing how take control when technology tries pulling pranks isn’t it?
Windows 11 Update Removal Process
Alright, let’s chat about something that might save you a headache: removing updates on Windows 11. We all know how it feels when an update turns your computer into a sluggish mess. We’ve all been there, right? Anyway, what happens is sometimes you just need to get rid of the update and restore peace to your digital world.
Why would you want to remove an update?
Sometimes updates cause unexpected issues like software glitches or unexpected behavior on your computer. Maybe a program suddenly stops working properly, or things just aren’t as smooth as they once were. It can be frustrating! The goal here is to help you regain control over your trusty PC.
To uninstall updates on Windows 11, you’ll need to follow these steps:
1. Open Settings: Click on the Start menu and select the gear icon. This’ll take you straight into ‘Settings.’ Inside, find and click ‘Windows Update’ in the left-hand menu.
2. View Update History: In the ‘Windows Update’ page you’ll see an option called “Update history.” Go ahead and click that!
3. Select Uninstall Updates: When you’re in ‘Update history,’ there’s gonna be this option called “Uninstall updates” right at the top under “Related settings.” Hit it!
4. Pick Which Update: Now you’ve entered a list showing each installed update by date—kind of like a timeline of changes made to your system recently! Find what’s causing trouble… maybe jot down codes if needed?
5. Remove That Update!: Select whatever outdated baggage needs ditching by clicking once with mouse—not twice—and press ‘Uninstall.’ A confirmation message will pop up asking whether sure nuff stuff has really gone wrong enough requiring removal or not (and believe me—it’s ok confirming choice).
Boom—done! Once process finishes rolling back tweaks made previously through specific revision—you might feel better knowing everything returned more-or-less stable state compared before unpredictable modifications started messing things round these parts earlier!
Remember though: removing individual items doesn’t prevent automatic reinstallation later should Microsoft push newer iterations someday again same patch tried earlier (kinda like boomerang coming back).
Rolling Back a Windows 11 Update
Ever found yourself in a situation where an update messed up your Windows 11? It’s like that unexpected rain on your sunny picnic! Sometimes, updates bring along bugs or simply don’t fit with your setup. But hey, no worries—there’s a way to roll things back.
Here’s how you can roll back a Windows 11 update:
You see, the first step is to access the settings. Now that’s super easy! Just hit the Windows + I keys together. This should open up the settings window.
Next, navigate to Update & Security. You’ll find it comfortably nestled towards the bottom of the options list. Click on it like you’re opening a new book chapter.
Scroll down and select Windows Update. It’s right there waiting for you like an old friend ready to help out.
You’ll notice an option to view your update history. Tap on that because we need those details!
Under this section, look out for Uninstall updates. Click it and you’ll see all recently installed updates listed out like items in a shopping basket.
Got a troublesome update in mind? Find it here among the listed items and simply select it. Then just hit that Uninstall button which feels pretty satisfying if I say so myself!
And there you go! The system will guide you through removing that pesky update, hoping everything gets back its groove as before!
Remember though: not every issue is solved by rolling back an update—it could sometimes be something else entirely causing trouble with software or hardware configurations—but this method works wonders often enough when things get wonky after updates.
A little tip: Keep track of any error messages during this process; they could clue us into what’s specifically going wrong if another solution might be needed later down line eventually needing addressing too… You know?
So give rolling back unwanted changes another thought whenever encountering difficulties post-update—it might just save future headaches altogether someday soon enough again real quick!
Uninstalling updates on Windows 11 might sound like a simple task, but it can sometimes turn into an unexpected adventure. Just the other day, I found myself tangled up in a web of update issues. You know how it goes—your computer suddenly decides it’s not your friend anymore and starts acting all moody after an update. That’s when you realize something’s gotta give.
So, you decide to uninstall the culprit. First thing you think is: “How hard can this be?” But here’s where things get interesting. You start by clicking through endless settings on your Windows 11 machine, trying to retrace your steps back to that pre-update bliss.
To begin with, you’d want to open up your settings—which feels like the mothership of options—and from there head into the ‘Update & Security’ section. It’s kind of like diving into a rabbit hole, but once you’re there, you’re just a few clicks away from tweaking recent installations.
Anyway, once you’ve navigated through those options—and believe me it’s not rocket science—you’ll find ‘View Update History’. This little menu is where all past updates are listed. It’s almost comforting knowing each update has its own digital footprint here.
But here comes the tricky bit! Clicking ‘Uninstall Updates’ seems simple and straightforward until you’re surrounded by tech jargon or waiting for what feels like forever while Windows processes undoing changes.
Oh boy! The feeling when everything finally falls back into place post-uninstallation… It’s pure relief coupled with the joy of problem-solving victory! As much as technology tries our patience sometimes, overcoming such hurdles adds another feather in one’s cap of digital triumphs!
Next time if an update takes your system hostage again—and trust me they do have their moments—at least now there’s a rough roadmap we traced together so those once-intimidating steps become familiar terrain next time around!