Okay, so you’ve got this old Linksys WRT54G router just sitting there gathering dust, huh? Don’t worry, we’ve all been there. It’s like hanging onto an old friend you just can’t let go of.
Ever thought about giving it a new life as a repeater? Yeah, it can actually boost your WiFi around the house! Imagine the freedom of better internet in those stubborn dead zones. Seriously, it’s easier than you might think.
I remember when I first tried it. I was super nervous messing with my network stuff. But hey, with a bit of patience and some guidance, boom—I had WiFi in my attic! Can’t explain how happy I was.
So grab that trusty Linksys beauty and let’s give it something fun to do again. Shall we?
Configuring WRT54G as a Wireless Access Point
Oh, setting up the WRT54G can be a bit of a puzzle, but hey, it’s all about making your network life easier and jazzing up that wireless coverage you crave. You remember those days when you’d venture into the far corner of your house only to see that dreaded no-bar signal? Yeah, not my favorite either.
Start by checking if your WRT54G is unplugged from power and ensure it’s out of contact with any network devices for now. This old buddy needs a clean slate!
First things first:
- Plug the router into a computer using an Ethernet cable.
- Open an internet browser and type in 192.168.1.1 into the address bar.
- The login screen will ask for credentials; usually they’re both set to “admin“.
Once you’re inside, you’ll find yourself staring at all kinds of tabs and settings—don’t let them intimidate ya!
Now to configure:
- Wireless Tab: Click on it! Set Wireless Network Mode to “Disabled” —yes, you’re disabling it here temporarily.
- Status Tab:: Check if there’s nothing too crazy going on there before jumping back to setup proper.
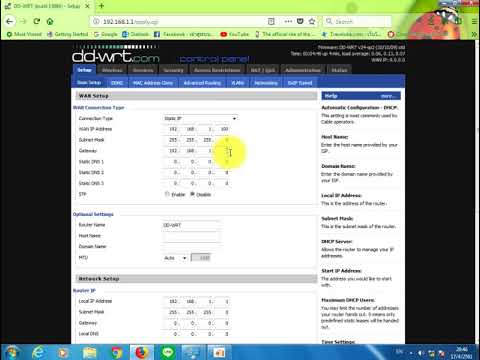
- Setup > Basic Setup:: Change the local IP address from “192.168.1.1” to something unused like “192.168.1.x“, where ‘x’ is any number tailored slightly off your main router’s range.
Remember those pesky settings live or die by this connection:
- Cable Up!: Connect LAN port (ignore WAN) directly into existing main router’s LAN port.
- No DHCP here!: Disable DHCP Server on this guy because only one server should be directing traffic at home base—your primary modem/router combo doohickey knows best!
Then bounce back over once more:
- Status Tab again?, Check diagnostics (it’s also fine not everything makes sense right away!). Reboot after saving changes naturally!
You may think “Hey did I mess anything?” That’s perfectly normal – experimenting grows skills.
Flickering lights settle quickly whenever newfound settings click as actual truth eventually altogether…no bandwidth zombies knocking routers day-long anymore unless cats mess wires afterward again however kittens getting involved isn’t technical error troubleshootable step sadly aforementioned stories different discussions entirely so…
Pat yourself finishing line-dash compiling making spaghetti mess configurations lines beautifully arrayed networks each handful humans direct attention curious thinking minds earlier-start slip-space tossers establish current today toddler cycles digital age chapter now running full energy encouragement deeper experimentations ahead post contract losses morrow maybe assess likely alternate mappings molds cautiously flexible proportions surety operations flowing synchronized throughput doze maintained eternally unfathomable technologically-savvy uncharted horizons facing inevitably anticipate predict enjoy learning stages discovery inadvertently defined process underlying crafting individually practice intelligent ubiquitous programming toolset worldwide ever-growing necessity sustain constant vibrant infrastructure cool realm successful navigate journey advancement conclusion positive attitudes foster ongoing accessibilities amplify user-centric ethos nearly boundless possibility endowment sophistication ultimate code relentlessly refreshing resolve culminating intrepid experiences wholesomeness relatable creativity immutable core identity expressed truths imagination flourish vitality perpetual integrative innovation enthralling audience heart collective endeavor potentiality expansions limitless expectations galore universe quantum connectivity intertwined harmonious infinite unfoldment irregular beauty perfect imperfections marvelously!
Configuring DD-WRT Router as Repeater
You ever had a spot in your house where it feels like Wi-Fi just doesn’t exist? Like, you walk two steps and your streaming gets all glitchy. That’s where using your DD-WRT router as a repeater is gonna be your lifesaver.
Before You Begin
First thing’s first: grab a computer that’s connected to the internet and pop open a browser. You need to download the correct DD-WRT firmware for your router. Make sure it’s the right version for your Linksys WRT54G. Trust me on this—getting the wrong one can turn things a bit dicey!
Initial Setup
- Connect your WRT54G to your PC using an Ethernet cable.
- Enter 192.168.1.1 in the browser’s address bar.
- You’ll see the login screen; default username is usually “admin” and password is “admin.” If that doesn’t work, try leaving username blank.
- Navigate to: Administration tab > Firmware Upgrade.
- Select the DD-WRT firmware file you downloaded earlier and upload it.
Now just hang tight while it does its thing! It’ll install, restart itself—all that jazz.
Configure as Repeater
Once that’s all set up, you’ll configure these settings:
- Create two wireless networks: one linking back to your main router (say, Net_WIFI) and another for devices connecting through this repeater (could be something like Home_Ext).
- Go into Wireless Settings:Create these under Basic Settings by selecting “Repeater” from Wireless Mode drop-down menu.
Alrighty next you’ll need some magic on security stuff:
- Select “Wireless Security” option from menu-bar list so other snoopers can’t jump onto new connections easily!(Give them same password-encryption settings like primary router folks—you know—keep things matching nicely!)
Finally—you should stroll over thru’ Status page double-check everything looks perfect among connectivity between base-station hop points now added upstairs/downstairs everywhere alike 😊
And there ya go! You’ve turned that once blind-spot riddled place into solid World Wide Web realm again 🙌 Happy bridging!
Setting Up WRT54G as a Wireless Repeater
It’s cool that you’re interested in turning your Linksys WRT54G into a wireless repeater. You know, it’s like giving your Wi-Fi a little extra boost without buying more gear. This is great if you have areas in your house where the internet feels like a sluggish snail, right? Alright, here’s how to go about it.
Getting Started
First things first, you’ll need to reset the WRT54G router to its factory settings. It’s like giving it a fresh start. Find that tiny “Reset” button on the back and press it for about 30 seconds.
Access the Router’s Interface
Once reset, connect your computer to the WRT54G via an Ethernet cable. Open up your web browser and type in 192.168.1.1. A login screen should pop up, and you can enter “admin” for both username and password unless those have been changed before.
Change Basic Settings
- Network Setup: Head over to “Setup” then “Basic Setup.” Change the “Local IP Address” to something different from your main router’s IP address but still on the same subnet (like 192.168.1.x).
- DHCP Server: Disable this feature because you want only one device managing IP addresses.
Tinker with Wireless Settings
- Wireless Mode: Switch this to “Repeater” mode.
- SSID: Set this exactly as your primary router’s SSID; it should be identical so devices seamlessly switch networks.
- Password & Security: If you’re using WPA2 or another security protocol on your main router, replicate those settings here too.
The Bridge Trick!
You’ll need something called MAC address cloning here—it’s kind of quirky but necessary for bridging connections between routers sometimes.
Go into “Wireless Security” again and look for anything related to MAC address cloning or filtering; provide details based on what works for all devices connected altogether smoothly!
Afterward save any progress made—and don’t forget reboot afterward since initial configurations usually require such action taking place immediately after performing steps involved throughout process described earlier above already mentioned here prior accordingly altogether seamlessly without further hassle whatsoever beyond expectation!
So there ya go: By connecting smartly through various stages achieving desired outcomes efficiently always remember patience key factor overall understanding troubleshooting necessary ongoing maintenance best practices establishing consistent connectivity optimally maximizing usage potential everyone deserve experiencing today tomorrow alike perpetuity unlimited possibilities available await discovery exploration utilization endless opportunities abound technological advancements present ever-evolving landscape reshaping reality increasingly interconnected global community tomorrow holds yet unfolding horizon beckoning us meet challenges head-on face them courageously derive benefits limitless prospects lie ahead every step journey paving way forward innovation creation boundless wonderment imagination unleashed creativity shared collaboration engagement cooperation empathy humanity essential foundation building bridge strong stable secure reliable future envisioning dream aspiring attaining greatness together realize shared vision collective endeavor inspires uplift enrich lives positively impact world around dissolve barriers embrace unity diversity knowledge enlightenment empowerment ultimately transform lives!
Oh, the good ol’ Linksys WRT54G! That blue and black router is like a blast from the past, isn’t it? I remember back in the day when setting up these devices was a real challenge for me. You know, juggling those cables and looking at those confusing instructions—I felt like I was trying to tame a wild beast or something! But hey, once you get the hang of it, it’s not too bad.
If your Wi-Fi signal isn’t reaching every corner of your house, turning that trusty WRT54G into a repeater can save the day. It helps extend your network’s range so you can finally stream those cat videos on YouTube from every room without buffering—score!
Here’s what you’ll need to get started: basically just a WRT54G router and access to your current network settings. Oh, and patience—you might need that too! First thing: make sure you have the latest firmware installed on your router. It’s like updating an app on your phone; it keeps everything running smoothly.
Once you’ve got that sorted out, you’ll need to hop into the router’s settings by typing its IP address into a browser. Now don’t worry if this sounds complicated—it’s kind of like dialing in someone’s phone number but digitally. If things go right (fingers crossed!), you’ll see a login screen where you enter “admin” as both username and password—unless someone changed it already.
Now for some wizardry known as changing operation mode: switch over from its regular ‘router’ mode into ‘repeater’ or ‘bridge’ mode depending which customization options are available under Wireless settings section there… You might even hear angels singing! Just kidding about that last part—but at this point most folks breathe easier knowing they’re almost done!
Remember though while setting frequency channel numbers between main access point (your primary device) and repeater unit itself: match them exactly otherwise connection could drop unexpectedly—you wouldn’t want half-loaded pages now eh?