Alright, so you know that feeling when your computer’s running slow and you just want to pull your hair out? Yeah, it happens to the best of us. Imagine this: you’re trying to open a folder or start a program, and it’s taking forever. It’s like watching paint dry—ugh! What’s causing this? Sometimes, those pesky temporary files.
Don’t worry; it’s not as scary as it sounds. They’re like crumbs left over from your computer snacking on data while you work or browse the web. Over time they pile up and slow things down. You can easily clean them up with a few clicks.
Think of it like tidying up after a party—sweep away the clutter to make everything run smoothly again! And hey, I’ll walk you through it step-by-step in Windows 8 land without breaking anything important. Shall we get started on this little adventure?
Clearing Temporary Files in Windows 8
You know, clearing out temporary files from your computer is like giving it a little bit of love. It can help speed things up and free up some space. If you’re using Windows 8, it’s actually pretty simple to do this. I’ll guide you through, step by step.
Why Clear Temporary Files? Well, over time, your computer stores these temporary files that are supposed to be useful in the short term but tend to accumulate and become unnecessary clutter.
Let’s get into it:
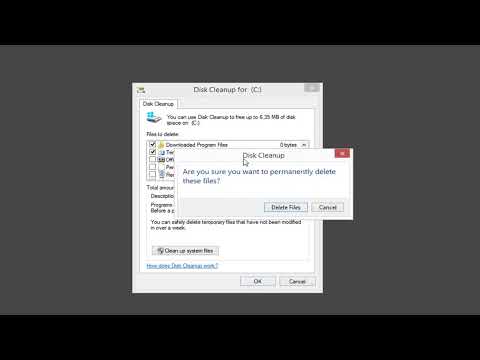
- Disk Cleanup Tool: This is like your best buddy when it comes to tidying up. To get started, just search for “Disk Cleanup” from the Start screen.
- Select Drive: Once you open Disk Cleanup, you’ll need to choose the drive where Windows is installed (usually that’s the C: drive) and then click “OK”. The tool will calculate how much space you can clear—just give it a minute.
- Select Files: Now’s the time for some decision-making! You’ll see a list of file types with checkboxes next to them. Look for those labeled as “Temporary files”. You could also select other categories if you feel adventurous.
- Cleanup Time!: Hit “OK” then “Delete Files”. And there you go—your computer should be feeling lighter already!
Another way involves doing a manual search:
- Press Win + R, type in %temp%, and hit Enter.
- This opens the Temp folder with loads of files in sight; use Ctrl + A to select them all—and don’t worry too much ’cause these aren’t needed long-term.
- Hit Delete and send them off on their merry way! Something might need admin permissions—with four-eyed nerd glasses flashing—just click “Continue”.
One last thing: Doing this regularly minimizes lagging or sluggishness overall. Every so often—or whenever things seem slower than grudging molasses—it’s good practice getting rid.
So yeah there ya have it; keep those temporary goblins at bay! Your PC will probably thank ya silently by buzzing along nicely… maybe give yourself some credit there too?
Identifying Safe Temporary Files to Delete
You got it! Let’s chat about dealing with temporary files in Windows 8. Oh, temporary files! They can be a bit of a mystery if you’re not familiar with them. But don’t worry, I’ll help you figure out which ones are safe to delete.
Why Are Temporary Files Created?
First off, these files kinda act like placeholders while your computer’s running different tasks. Imagine when you’re browsing the web or installing apps; they need to park some data for a bit. That’s where temp files come in handy.
Which Temporary Files Are Safe to Delete?
Here’s the deal, you can get rid of certain temp files without messing anything up on your system:
- Browser Cache: Your browser stores images and data from websites to load them faster next time. Deleting this is totally safe as your browser will create new cache the next time it needs some.
- Old Windows Updates: After updates install successfully, leftover update files just take up space. Clearing these is perfectly okay.
- System Error Memory Dump Files: These are created when Windows encounters an error—if you’re not troubleshooting issues actively, they’re useless clutter.
The Best Way to Delete Temporary Files Safely
Use the built-in tool called “Disk Cleanup.” It makes things easier by listing out what you can remove safely. Here’s how:
- A simple search: Press the “Windows key + W”, type “Disk Cleanup” and select it from the results.
- Select Drive:: You’ll be asked which drive you want cleaned—usually C: drive is where all those temp gremlins live.
- Select What to Clean Up:: Check “Temporary Internet Files,” “Temporary Files,” and any other file types you’re certain about (like “Recycle Bin”).
Go on and click OK once you’ve chosen what’s gotta go!
Just a Quick Note!
Sometimes programs might store critical data as temp ones too—it’s rare but possible—so if in doubt leave those files alone or look them up first just in case! You definitely don’t want surprises like malfunctioning apps down the line after clearing stuff out.
Feel better now cleaning without fear? Hope so!
Manual Cleanup of Temporary Files
Alright, let’s tackle the mystery of cleaning up temporary files manually. It’s like tidying up your room, you know? Sometimes you just have to dive in and get rid of all that digital dust gathering around.
When your computer starts feeling a bit sluggish, those temporary files might be partially to blame. They’re meant to be just that—temporary—but they often stick around longer than needed. To clear them out in Windows 8, there’s a straightforward process you can follow. Let’s have at it.
Step 1: Access the Temp folder
First thing’s first, you’ll want to open the Run dialog box. You can do this by pressing Windows key + R. Once it pops up, type in “%temp%” and hit Enter. This little trick takes you straight into the thick of it—the Temp folder on your computer where all these files are hiding out.
Step 2: Select and Delete
In front of you now is a list of many mysterious files and folders—don’t worry too much about what they’re precisely for; most are leftovers from software installations or updates. Just press Ctrl + A to select everything in there, then hit the Delete key on your keyboard. It’s that simple! Windows might grumble over not being able to delete some because they’re currently being used—just skip those.
Step 3: Empty Your Recycle Bin
Okay, you’ve moved them out of sight… But not quite out of existence; they’re chilling in the recycle bin now. Go ahead and right-click on your Recycle Bin icon on desktop (the little trash can), and select “Empty Recycle Bin“. And poof! They’re gone for real this time.
It’s sort of like sweeping under your bed then taking out the trash—it doesn’t feel like much until suddenly everything feels neater again!
Note:
If you’re feeling cautious—and hey who wouldn’t after “accidentally” deleting an important file once upon a time—you could move these temp files elsewhere before clearing everything wholesale off their face-of-computer-planet…but honestly most people don’t bother with such steps here since these are almost always disposables anyway!
The little anecdotes that come from sorting through digital clutter is kindof fun if nothing else: “Wowzers—I hadn’t known I’d installed x tool or y software!” And maybe enjoy having swept away some cobwebs before jumping back online super refreshed!
Hey there! Remember the days when your computer seemed to slow down out of nowhere? Oh boy, I’ve been there too. It’s like, one moment you’re cruising through your tasks, and the next — bam! Everything’s crawling along at snail’s pace. Such a pain, right?
Windows 8 can sometimes be as mysterious as a cat hiding your socks. It tends to accumulate a bunch of temporary files that kinda hang around like uninvited guests at a party. These files are meant to be short-lived but sometimes they just stick around longer than they’re supposed to.
Here’s the thing: clearing out those temporary files can work wonders for your computer’s performance. It’s like giving it a refreshing shower. You’ll breathe easier knowing everything’s running smoother.
Now let me guide you. First off, you want to open the “Disk Cleanup” utility, which is like pulling up an old friend who knows just what to do when you’re in a funk. Just navigate over by typing “Disk Cleanup” into the Start menu search bar and you’ll see it pop up in no time.
Once you’ve got it opened up, you’ll select the drive that needs tidying—usually it’s “C:”—and hit OK. The tool will calculate how much space you can free up; this part might take a little while bit but hang tight!
You’ll get this list of file types, and temporary files will be among them plus some others that have outstayed their welcome too. Select what you want gone with checkmarks next to “Temporary Files,” and any others you’d rather see vanish.
Hitting OK does the trick eventually! Your computer should feel sprightly again—it’s kind of amazing how such small steps can make such big differences!
Remember though; while cleaning these files is generally safe ’cause they’re just leftovers from apps or browsers doing their job temporarily—be cautious not deleting anything you’re unsure about if something seems unfamiliar maybe leave it unchecked for now till researching further just so nothing important gets accidentally zapped away .
Anyway happy cleaning!