You know how sometimes you just want to try out a new operating system on your Mac without messing up what’s already there? That’s where VirtualBox comes in handy. It’s like having a little sandbox where you can play around, try things out, and see what happens.
Now, if you’ve never downloaded or installed VirtualBox before, it might sound kinda technical and intimidating. But no worries! I’ve got your back on this one. I mean, who hasn’t been confused by all the tech jargon at some point?
We’ll stroll through the process together—just like that time we figured out how to fix that random glitch on your laptop. Remember that? Yeah, piece of cake! So grab a comfy seat and let’s get this show started—you got this!
VirtualBox for Mac Pricing and Availability
Hey there! You’re curious about VirtualBox for Mac and want to know more about its pricing and availability? You’ve come to the right place. Let’s break it down in simple terms.
First off, the big question everyone wonders: Is VirtualBox free for Mac? The short answer is yes! VirtualBox is open-source, which means it doesn’t cost you a dime to download and use on your Mac. It’s like a gift from tech geeks everywhere.
Where can you get it? You can find VirtualBox on the official Oracle website. It’s crucial to download it from there because other sources might not be safe. Nobody wants extra headaches with malware, right?
Okay, so how do you install this thing once you’ve got it? Here’s how you do:
- Download: Go to Oracle’s website and grab the latest version of VirtualBox for Mac.
- Open: Click on the downloaded file, which should be in your Downloads folder.
- Install: You’ll see an installation wizard pop up. Just follow any steps they give ya!
Now, apart from being free, VirtualBox has some cool perks as well. If you’re thinking about running another operating system inside your Mac (like Windows or Linux), this tool does the trick beautifully without much fuss.
That said, keep an eye out for updates. New versions or patches are released periodically which keeps everything running smoothly—and more safely too! It can also get rid of those pesky bugs.
In a nutshell: if you’re looking into using different OSs on your Mac without shelling out cash, VirutalBox could be what you’re after! Remember though—sticking with official downloads ensures you avoid nasty surprises down line when least expected.
So now that we’ve cleared things up around Virtual Box’s cost (or rather lack thereof) plus where & how easily accessible via downloading directly from trusted source—you’re ready explore all options fully armed knowledge needed start journey today itself!
VirtualBox Installation Safety Considerations
Installing VirtualBox on your Mac can open up a whole world of possibilities by letting you run other operating systems right from your current system. However, making sure you do it safely is super important to keep everything running smoothly and to protect your data.
First things first, getting VirtualBox—from its official website—is essential. You know, sticking to trusted sources really matters when downloading software. It’s like buying groceries from the neighborhood store where you know the products are genuine.
Once you’ve downloaded the installer, take a moment to verify its integrity. This might sound techy, but it’s like checking that your eggs aren’t cracked before heading home from the store! Basically, you compare checksums—unique codes provided by Oracle (the company behind VirtualBox)—to make sure the file hasn’t been tampered with.
Now, when you’re ready to start the install process, keeping an eye on permissions is smart. During installation, it’ll probably ask for admin access. Granting such permissions should always be done with caution because it allows significant changes on your machine.
- Check system requirements: Make sure your Mac meets VirtualBox’s minimum requirements for a smooth experience.
- Create backups: Even though installing VirtualBox usually doesn’t mess things up, having a backup is never a bad idea—just in case.
- Disable unnecessary permissions: After setting up VirtualBox and related virtual machines (VMs), review and disable any permissions that are no longer needed.
- Password protection: Make sure both your macOS account and any VMs have strong passwords set up.
Keep in mind that sharing folders between macOS and a VM can be handy but also opens another pathway for potential threats if not handled carefully. Set limits on what can be shared until you’re familiar with how secure each setup option feels.
Finally—and this might feel like common sense—you’ll want to periodically check for updates. These update patches fix security holes or improve performance without you needing much effort other than clicking “update.” It’s like changing oil in a car; simple yet vital maintenance helps prevent bigger issues down the road!
So there it is! Being mindful about where downloads come from and how information flows ensures both efficiency and protection while enjoying VirtualBox’s benefits on Mac systems.
Safe Installation of VirtualBox on macOS for Windows 10
Installing VirtualBox on your Mac can feel like stepping into uncharted territory, especially when you’re setting it up to run Windows 10. It’s kinda like opening a door to another world inside your computer! Let’s walk through how to do this safely and painlessly.
Step 1: Download VirtualBox
Head over to the official VirtualBox website. You’ll find it easily enough by searching “Download VirtualBox for Mac.” Once you’re there, ensure you download the version for macOS. Don’t forget, using the official site is vital to avoid malware or corrupted files. Seriously, it’s like borrowing a movie from a friend rather than from some sketchy stranger at the park.
Step 2: Start the Installation
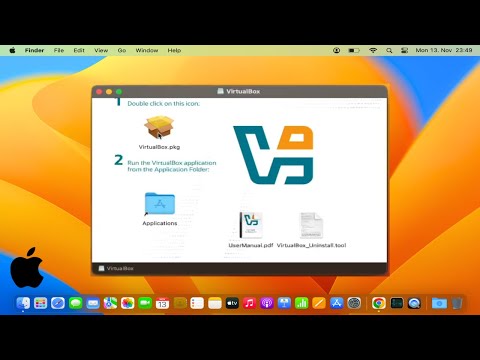
Now that you have that downloaded file sitting in your downloads folder, go ahead and open it. It’s gonna be an installer package file (something with .dmg at the end), which is super common for mac installations, and it’ll guide you through what needs doing.
- Open the .dmg file.
- Double-click on “VirtualBox.pkg” within that file.
It helps if you’ve got your macOS security settings permitting this install; they can be a little overprotective sometimes.
Step 3: Follow Installation Prompts
Just follow what gets displayed on screen—it’s kind of straightforward most of the time cuz they’ve made it user-friendly. Occasionally during installation, you’ll need to approve certain permissions in System Preferences under Security & Privacy (under “Allow apps downloaded”). You might have been out that way before if you’ve installed other software outside Apple’s ecosystem.
Create Your Windows 10 virtual machine (VM)
Okay, so now VirtualBox is ready and waiting; go ahead and launch it!
- Click “New.”
- Name your new VM—call it something cool like “Windows High Castle” or whatever suits ya!
- Select Microsoft Windows as Type and choose Windows 10 (64-bit) as Version.
- You’ll also need an ISO image file with Windows 10 installation files; grab that from Microsoft’s official site only! Remember safety first?
Then follow those steps tho given inside VM setup wizard—it’ll ask about memory allocation (I suggest minimum of four GB if ya can spare), hard disk type/size (default options work fine more often than not).
And voila—that should getcha started running Windows alongside macOS pretty smoothly once everything’s set up accordingly!
Feel free trying out things around in here but remember keeping backups handy always cuz no one likes losing stuff ‘unintentionally’.
Downloading VirtualBox on a Mac, huh? It’s one of those things that might seem a tad intimidating at first, but you know what? It’s actually pretty manageable once you’ve got the hang of it. I remember the first time I attempted it. I was slightly unsure, staring at my screen like it was about to reveal some kind of hidden secret!
So here’s the deal. VirtualBox is a super handy tool if you want to run different operating systems on your Mac. It’s like having multiple computers in one—no joke! But before jumping in headfirst, let’s ensure you’re getting it from a legitimate source. Head over to the Oracle website—that’s where you’ll find the real deal.
Once there, you just have to pick the version for Mac OS. Click download and let your computer do its magic. You’ll soon have a neat little file sitting in your Downloads folder. Now, here’s where things get interesting—you’ve got to open that disk image file and run through the installation process.
It’s tempting to blaze through installations without reading anything (we all do it!). But take a moment this time around just to check what permissions and extras you’re granting access too.
If all goes smoothly—and fingers crossed, it will—you’ll have VirtualBox up and running in no time! Remember though, when creating virtual machines within VirtualBox later on: give thought about how much memory you’re allocating so both your main system and virtual environment run happily side by side.
And there ya go—you’re set up with VirtualBox on your Mac safely! Takes me back every time thinking about how empowered I felt after getting past my initial hesitations. Who would’ve thought running multiple operating systems could be made accessible right from our cozy little Macs at home?